Where all your questions are answered.
How can we help? Select a topic below to see frequently asked questions:
Manage Your Account
- Sign in to the Dashboard Account.
- Start exploring all the features of Agronomy 365!
- Sign in to your dashboard account.
- Navigate to the “My Users” tab.
- Send your custom referral link to your customers using our built in invitation system, simply hit the invite member button in the top right corner!
Not seeing your ‘My Growers‘ Page? Fill this form out letting us know, and we will get you all set up.
- Navigate to the My Users page .
- Your existing users will be displayed here.
- Click the “Invite Members” button and enter the email of the user you wish to purchase a membership for.
- Check the ‘Bill to my account’ box on the invitation
- Click invite
- Enter your payment information
- They will receive an email notifying them of the purchase and asking them to accept the membership registration.
Note: We recommend contacting your customer directly as well to ensure they are able to access their new account.
Accessing Resources
Soak up all things Agronomy 365 with these additional resources, available with your Agronomy365 membership:

- Login into your dashboard and go to the Education Tab
- Select “Nutrient Recommendation Sheets” and open the file.
- Login into your dashboard and go to the Education Tab
- Select the appropriate In-Season Management Sheet (Early Season, Mid-Season, Late Season and Tissue Ranking Sheets).
- Login into your dashboard and go to the Education Tab
-
Select the Webinar Series video to watch, and enjoy!
New videos in the Webinar Series will be released bi-weekly from June 1 through September 1.
**The Video Library is available for Tier 2 Elite memberships.
- Login into your dashboard and go to the Education Tab
- Select a video to watch, and enjoy!
For more information on BaselineRx, please visit the BaselineRx page. Download the Cost Estimator Tool below or talk to one of our agronomy representatives to get started.
Sampling Tips
For further information on how to review your latest soil or tissue report please see this tutorial:
Please submit your soil and tissue samples through the Agronomy 365 Dashboard.
In addition to this, please identify the following on the sample packaging:
- Customer Name
- Field Identification Name
- Type of Analysis (Soil or Tissue Analysis)
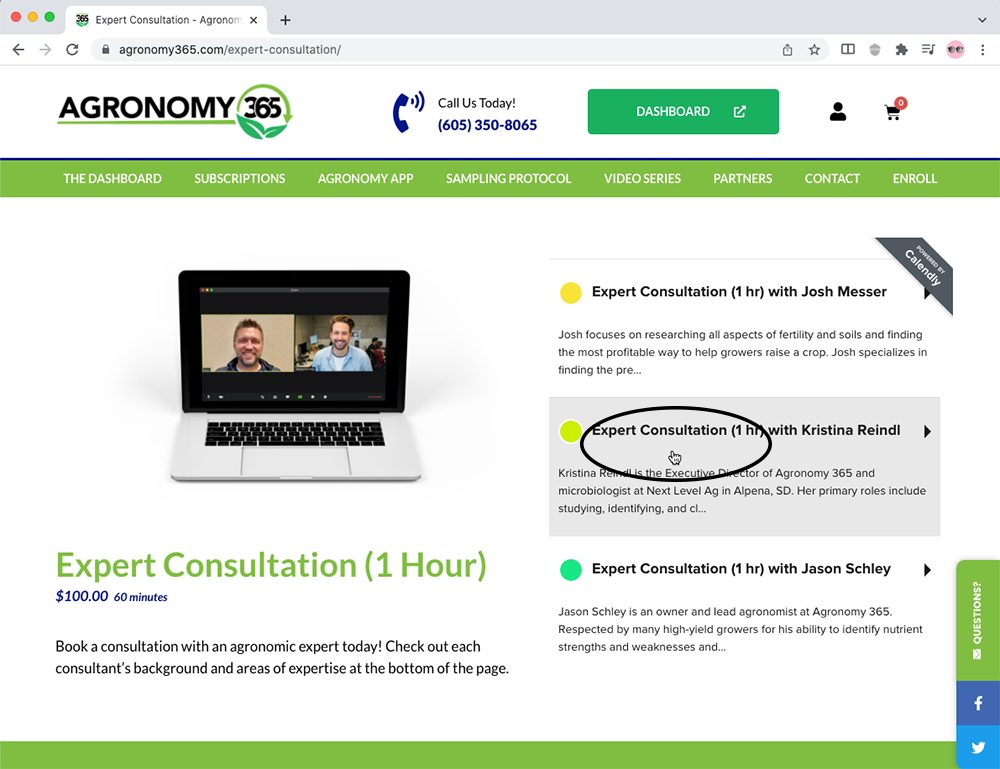
- Navigate to the Enroll page on the agronomy365.com website.
- Click the Book A Consult button.
- Select which expert you’d like to set up a consultation with.

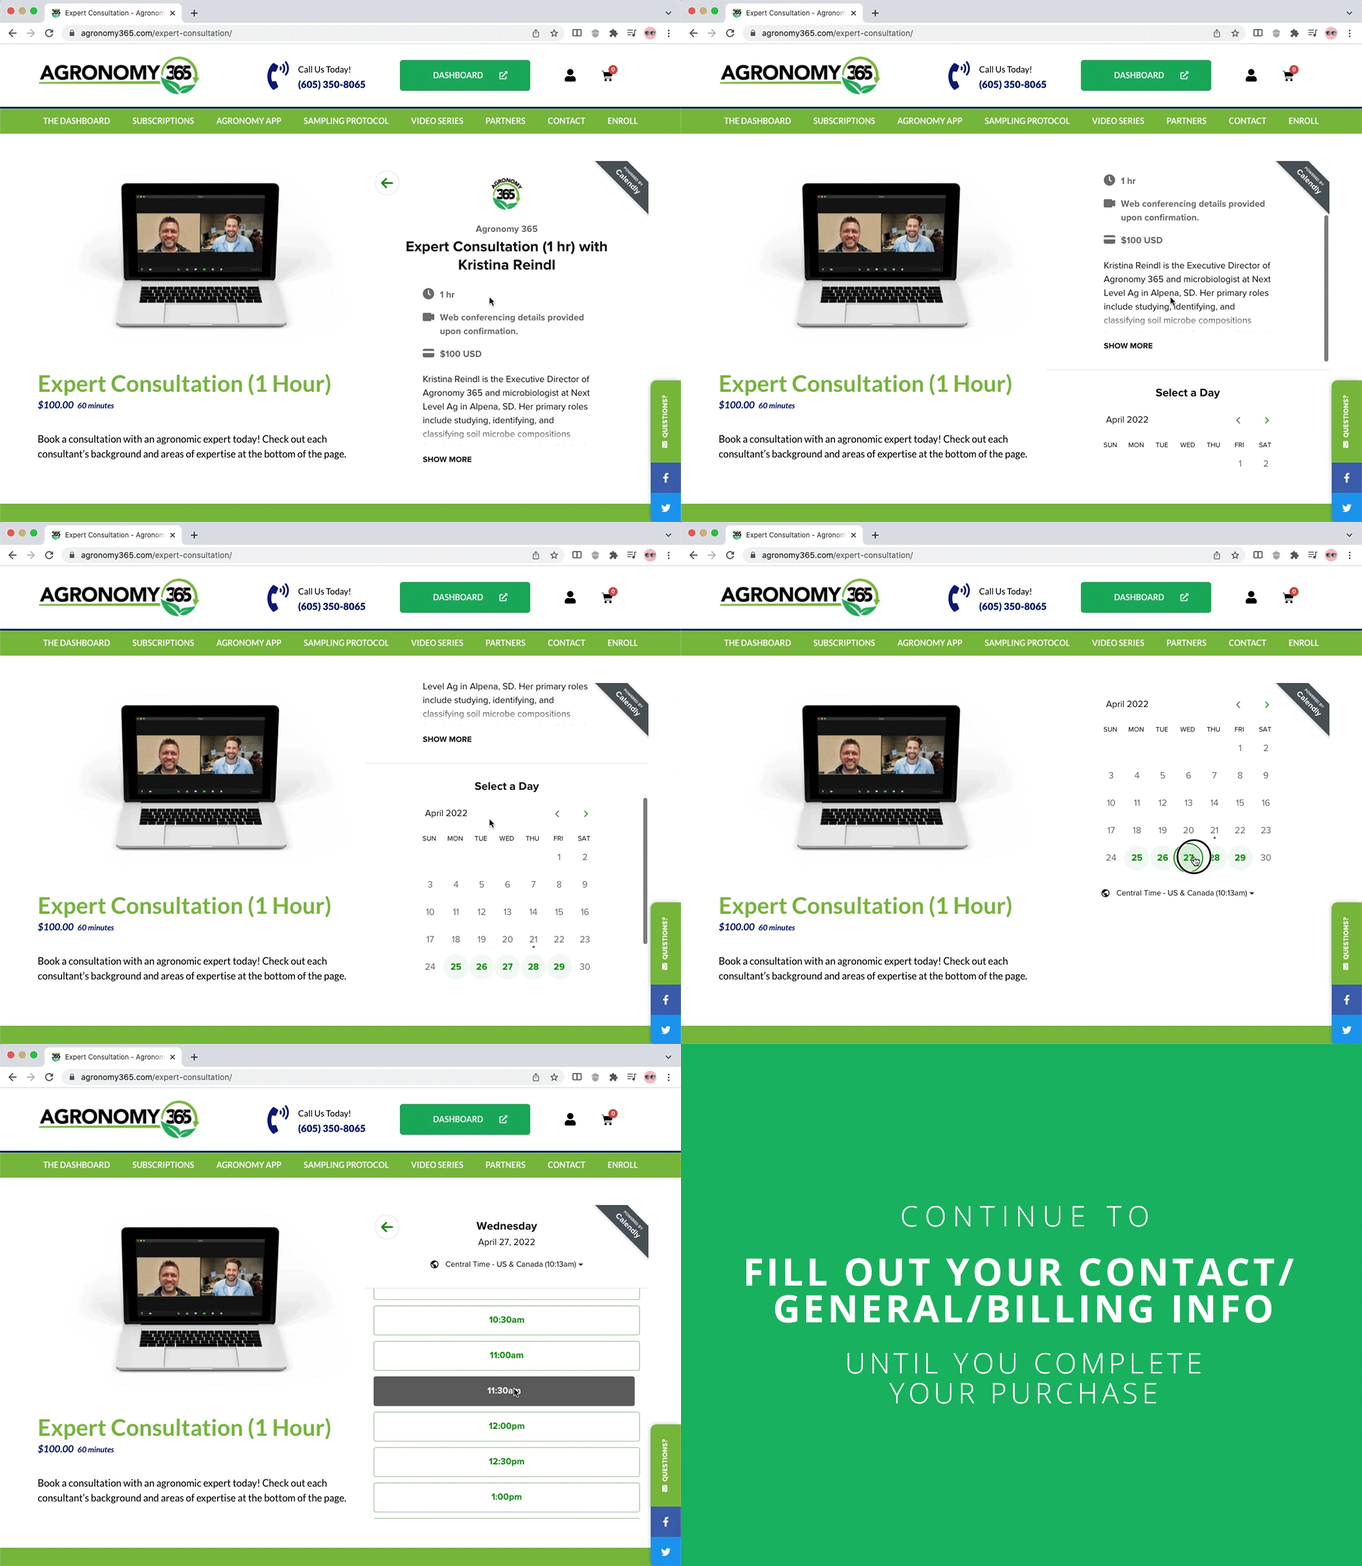
- Once you’ve clicked on your consultant, please scroll down within that box to the calendar.
- Select a date and time from those that are available. The available days are highlighted with a gray circle and green number.

- Select and click the green Confirm button.
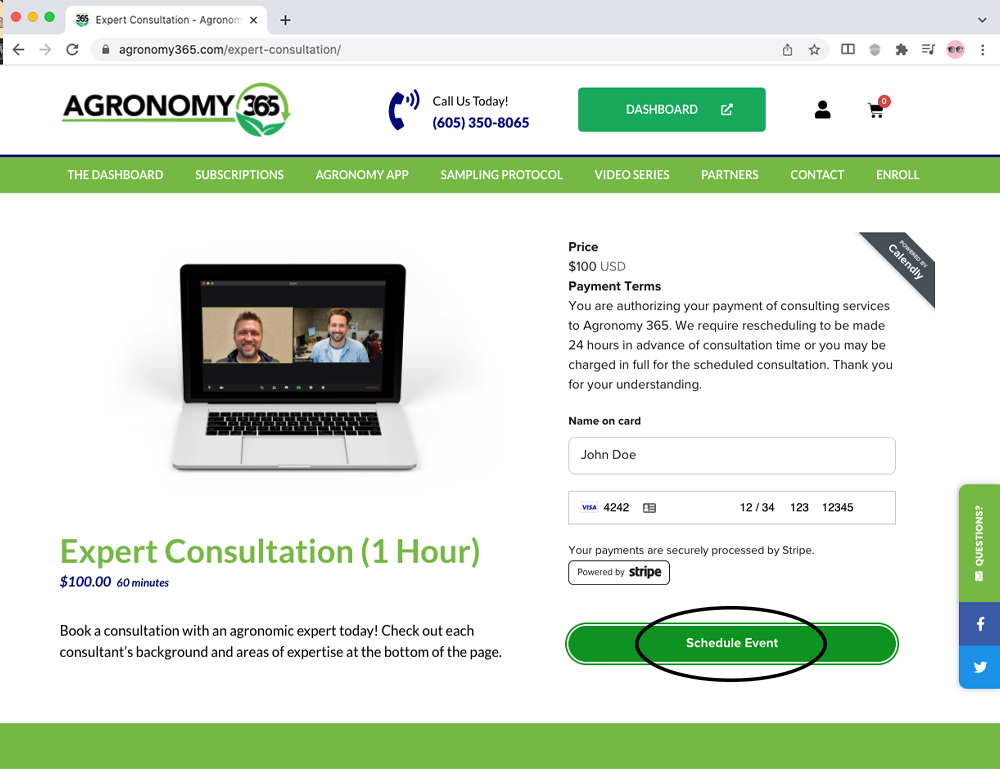
- Fill out your contact, general, and billing information.
- Click the green Schedule Event button to book your consultation.

- Once your order has been placed you will receive both a text message and email confirmation regarding your order.
- In the email confirmation, please “add this event” to your calendar. The calendar event/meeting will contain the zoom link needed to join the consulting hour.”
In-Field Recommendations
We recommend practicing this on a trial basis as there has yet to be a consistent way to track this. Plants that are vigor and energetic seem to have the best results. Lower populations help this as it is all about having the hormonal balance of Auxins vs. Ctytokins.
If you do not have cereal grains to plant the cover behind, interseeding corn is a great option. It is best to seed around the V7 growth stage. If you are interseeding in a wet environment we suggest interseeding before V7 growth stage. If you are interseeding in a more dry environment, then we suggest interseeding after the V7 growth stage. Establishment and energy storage is critical going into the V10 growth stage.
In general, lower maturities have less branching and need to keep the population higher. Typically, we see very little to no difference in soybean varieties and population changes until we get lower than 80,000 seeds per acre. We are trying to manage the nodes on a per-acre basis.
We have had high-yield growers apply a fungicide as a follow-up application to the V12 application. If your area experiences issues with southern rust, then a late fungicide application will be beneficial.
Yes. The addition of sodium hypochlorite to water is used as a viral/bacterial disinfectant to control pathogens from exiting the irrigation line and affecting crops. A great alternative for this is Vitamin C. This is a newer chemical method for neutralizing chlorine that would be very helpful. There are two forms that will neutralize chlorine safely – ascorbic acid and sodium ascorbate. Neither are considered a hazardous chemical. Vitamin C doesn’t lower the dissolved oxygen as much as sulfur-based chemicals do. Second, Vitamin C is not toxic to aquatic life at the levels used for dechlorinating your water. Although ascorbic acid is slightly acidic and, in large doses, will lower the pH of the treated water, sodium ascorbate is neutral and won’t affect the pH. Both forms of Vitamin C are stable, with a shelf life of at least one year in a dry form if kept in a cool, dark place. keep in mind that Vitamin C degrades in a day or two once it’s placed into the solution. Sulfur-based chemicals will lower the dissolved oxygen significantly, so we would suggest other options before this. Good old sunlight and oxygen will dechlorinate the water as well.
There is no maximum rate level for potash. Although it is possible, this is dependent on many factors.
Zinc has been known to play a hormonal role in soybean development where we suggest keeping it high on early soybeans. Copper is known for disease suppression and aids in the increase of sugar. When you cannot get your nitrogen levels up, we suggest applying molybdenum. Do consider your nitrate and ammonium levels in your soil when applying this.
The perfect time frame to y-drop on soybeans is between R2 to R3.5 growth stages to keep the plant completely satisfied.
When foliar feeding micronutrients, take into consideration these guidelines:
- Molecule Sizing – Choose a small module application. An example of this is that many use EDTA chelates, these chelates are large and struggle to get into the plant, and are better used in the soil.
- Application Timing – Overnight or early morning applications work best. Try to stay away from applying during the middle of the day unless you are feeding the soil as s leaf temperature of greater than 75ºF can slow or cease nutritional uptake.
- Absorption – This is best when humidity levels are lower.
- Application Spray – Keep the application mist very fine and not coarse.
- Water Quality – It has been found that softened water when mixing the application as some sodium may be present in the water molecules. RO water and structured water have shown some benefits as well. Carbonates and Bicarbonate loads in the water greatly diminish the products we are trying to get into the plants. If you are adding biology through the solution you must also keep your chlorine levels low in the solution. Water testing can be crucial. Using water with total hardness levels above 125 can cause a lot of tie-up issues.
- Mixing Bio-Stimulants – Fulvic, Humic, and Amino Acids are great add-ins for this type of application as they can help the plant absorb the solution at a faster rate.
***Special Note: Add in either a half or full gallon of a Urea based Nitrogen per acre to help with plant absorption and nutrient uptake.
Always be certain you’re not going to see leaf burn. Source your products from suppliers that understand the entire tank mix. Also, always jar test to make sure the mix is compatible.
Fungi thrive in acidic pH soil environments. Keeping your pH anywhere from 5.7-6.5 is optimal for both microbiology and crop production. From past research, BW Fusion’s MeltDown and Environoc 401 have been shown to work wonders. Turkey litter is a great alternative that can introduce carbon and calcium while also feeding the microbes to increase phosphorus uptake.
BaselineRx
Zones are sections of the field that share similar features, qualities and topography which influence their water holding and nutrient release capacity via biology and mineralization potential.
Soil type and quality can vary significantly across a field. Having zones helps growers rank the sections of their field according to soil quality and performance.
The BaselineRx zones tell us how much nutrition will be provided to the crop in different areas of the field. This allows farmers to apply nutrients more efficiently and effectively. When paired with the Indicator Complete or Indicator Max soil test, the zones help us understand how much nutrition the soil can provide a crop, what nutrients we need to apply, when is the best time to apply those nutrients, what form of the nutrient is ideal, and ideal application methods. These things all lead to better nutrient efficiency.
BaselineRx zones are NOT created based on yield, unlike traditional zone mapping services on the market. Instead, we take into consideration soil color (to determine pH balance), topography (to determine hills and depressions) and water movement. These layers are used when creating your custom nutrient prescription with BaselineRx due to the fact that nutrient availability varies across different soil types and moisture levels.
This is not needed. The soil test and fertilizer info sheet will give us all the information needed to make a valid script. If needed, we are able to use the same script for up to three years. After three years we recommend creating a new script. We recommend enrolling acres for scripts in front of nitrogen using crops (such as corn.)
You will receive your BaselineRx maps as a PDF for simple downloading. Additionally, sample points and zone shapefiles will be created and shared for your record as well. A fertilizer informational sheet will need to be filled out to have variable rate prescriptions made. Additionally, to build the predictive yield layer, you will need to share the low, average, and high yields for those acres to populate your custom recommendations.
To view the differences between the Indicator Max and Indicator Complete tests, please view this chart.
Sample points are set throughout the entire zone – representing the entire zone. We use the same sample points each time the field is sampled to provide consistency year after year.
We are able to get a full picture without needing to sample every zone. This helps cut down on costs for the grower and fertilizer equipment often can’t accommodate changes in every zone.
There is not a static yield goal per zone as we use a separate layer to capture yield in addition to the 10 Zones. In addition to the zones,there are dozens of yield goals within each zone. While that script is extremely accurate to the soil’s needs, the dry spreading fertilizer equipment just can’t keep up…yet.
When creating a planting script, we do use all 10 zones as planter technology is a lot more precise.
We capture the extremes (Zones 1 and 10) while getting the averages in other zones. Our mapping software will then add results from the zones sampled to get the full recommendation. We sample every other zone. Results will be shown as follows:
- Zone 1 Results = 1 & 2 on the map
- Zone 2 Results = 3 & 4 on the map
- Zone 3 Results = 5 & 6 on the map
- Zone 4 Results = 7 & 8 on the map
- Zone 5 Results = 9 & 10 on the map
Grids are a great solution when fixing pH or liming. BaselineRx zones are preferred to manage soil fertility. This method is based on strictly soil type, topography, and water movement. Yield based zones are not ideal, as you know many factors play into account to affect yield. Soil type and water movement never change unless the topography is changed drastically.
Example: Sand and gravel on a hilltop will not release nutrients the same as sand and gravel in depressions. One layer of data cannot be used to make optimal zones.
When signing up for BaselineRx, your Agronomy365 Representative will ask you if you would like Agronomy 365 to pull your samples. If so, we will need soil test point shapefiles and field boundaries. If you choose to sample yourself, we will provide you scripts, recommendations after the samples have been pulled. When sampling yourself, please follow this Sampling Guide.
The sample location number varies by field size. We recommend pulling two to three samples per sample point. For an Indicator Max or Complete test package, 0-6” is ideal. Location of the sample is most important if the field is strip-tilled. If the field is strip tilled, try to stay out of the strip, hot spots or anything else that could affect your sample results.
Samples are submitted by whoever took the sample. If you took the sample, then you will submit the sample through the Agronomy365 Dashboard. If you have an Agronomy365 team member sample your field, we will submit the samples on your behalf.


